|
|
|
|
|
|
|
Overview

|
User Manual IntroductionThis manual is targeted at those who just want to run the crawler. The user has downloaded a Heritrix binary and they need to know about configuration file formats and how to source and run a crawl. If you want to build heritrix from source or if you'd like to make contributions and would like to know about contribution conventions, etc., see instead the Developer Manual . Launching HeritrixTo run Heritrix, first do the following: % export HERITRIX_HOME=/PATH/TO/BUILT/HERITRIX ...where $HERITRIX_HOME is the location of your built Heritrix (i.e. the untarred target/distribution/heritrix.?.?.?.tar.gz dir if you built with Maven, or under the untarred heritrix.?.?.?.tar.gz if you pulled a packaged binary). Next run:
    % cd $HERITRIX_HOME
    % chmod u+x $HERITRIX_HOME/bin/heritrix
    % $HERITRIX_HOME/bin/heritrix --help
This should give you usage output like the following: Usage: heritrix --help
Usage: heritrix --nowui ORDER_FILE
Usage: heritrix [--port=PORT] [--admin=LOGIN:PASSWORD] [--run] [ORDER_FILE]
Usage: heritrix [--port=PORT] --selftest
Version: 0.4.0
Options:
-a,--admin Login and password for web user interface administration.
Default: admin/letmenin.
-h,--help Prints this message and exits.
-n,--nowui Put heritrix into run mode and begin crawl using ORDER_FILE. Do
not put up web user interface.
-p,--port Port to run web user interface on. Default: 8080.
-r,--run Put heritrix into run mode. If ORDER_FILE begin crawl.
-s,--selftest Run integrated self test.
Arguments:
ORDER_FILE Crawl order to run.
Launch the crawler with the UI enabled by doing the following: % $HERITRIX_HOME/bin/heritrix This will start up heritrix printing out a startup message that looks like the following: [b116-dyn-60 619] heritrix-0.4.0 > ./bin/heritrix Tue Feb 10 17:03:01 PST 2004 Starting heritrix... Tue Feb 10 17:03:05 PST 2004 Heritrix 0.4.0 is running. Web UI is at: http://b116-dyn-60.archive.org:8080/admin Login and password: admin/letmein Browse to the location you see printed out on the command line and login using the supplied login/password. See 'Launching crawl jobs via the web UI', the next section, for how to create a job to run. Launching crawl jobs via the web UIIf the program is launched with a web UI users can access the administrative interface with any regular browser. The admin section is password protected. Once logged in, the 'Console' (more on that later) is displayed. Near the top of the page are several tabs. To create a new job, select the 'Jobs' tab. The 'Jobs' page offers several ways of creating a new job.
It is not possible to create jobs from scratch but you will be allowed to edit any configurable part of the profile or job selected to serve as a template for the new job. If running Heritrix for the first time there is only the supplied default profile to choose from. Having selected a profile/job the user will be asked to supply a name, description, and seed list for the job (A seed list contains the list of URLs the crawler should start its crawl from). Once submitted the name can not be changed. The description and seed list can however be modified at a later date.
Below the data fields in the new job page, there are
five buttons.
Each of the first 4 buttons corresponds to a section of the crawl configuration that can be modified. Modules refers to selecting which pluggable modules (classes) to use. This includes the 'frontier' and 'processors'. It does not include the use of pluggable filters which are configurable via the second option. Settings refers to setting the configurable values on modules (pluggable or otherwise). Overrides refers to the ability to set alternate values based on which domain the crawler is working on. Clicking on any of these 4 will cause the job to be created but kept from being run until the user finish configuring it. The user will be taken to the relevant page. More on these pages in a bit. Submit job button will cause the job to be submitted to the pending queue right away. It can still be edited while in the queue or even after it starts crawling (although modules and filters can only be set prior to the start of crawling). If the crawler is set to run and there is no other job currently crawling, the new job will start crawling at once. Note that some profiles may not contain entirely default valid settings. In particular, User-Agent and From attributes in the the http-headers section -- see the Settings on your job -- *MUST* be set to other than the default in the default profile for the crawl to begin. You should set these to something meaningful that allows administrators of sites you'll be crawling to contact you. The software requires that User-Agent value be of the form... [name] (+[http-url])[optional-etc] ...where [name ] is the crawler identifier and [http-url ] is an URL giving more information about your crawling efforts. The From value must be an email address. (Please do not leave the Archive Open Crawler project's contact information in these fields, we do not have the time or the resources to handle complaints about crawlers which we do not administer.) Note, the state running generally means that the crawler will start executing a job as soon as one is made available in the pending jobs queue (as long as there is not a job currently being run). If the crawler is not in the running state, jobs added to the pending jobs queue will be held there in stasis; they will not be run, even if there are no jobs currently being run. The term crawling generally refers to a state whereby a job being currently run (crawled): i.e. pages are being fetched, links extracted etc. Note that if a crawler is set to the not run state, a job currently running will continue to run. In other words, a job that started before the crawler was stopped will continue running. In that scenario once the current job has completed, the next job will not be started. ModulesThis page allows the user to select what URIFrontier implementation to use (select from combobox) and to configure the chain of processors that are used when processing a URI. Note that the order of display (top to bottom) is the order in which processors are run. Options are provided for moving processors up, down, removing them and adding those not currently in the chain. Those that are added are placed at the end by default, Generally the user should then move them to their correct location. Detailed configuration of these mo dules is then performed by going to the 'Settings' page afterwards. FiltersCertain modules (Scope, all processors, the OrFilter for example) will allow an arbitrary number of filters to be applied to them. This page presents a treelike structure of the configuration with the ability to add, remove, and reorder filters. For each grouping of filters the options provided correspond to those that are provided for processors. Note however that since filters can contain filters the lists can become complicated. As with modules, detailed configuration of the filters is done via the 'Settings' page. SettingsThis page provides a treelike representation of the crawl configuration similar to the one that the 'Filters' page provides. In this case however an input field is provided for each configurable parameter of each module. Changes made will be saved when the user navigates to one of the other crawl configuration pages or selects 'Finished'. On all pages choosing 'Finish' will submit the job to the pending queue. Navigation to other parts of the admin interface will cause the job to be lost. OverridesThis page provides an iterative list of domains that contain override settings, that is values for parameters that override values in the global configuration. Users can navigate to any domain that has an override, create/edit the overrides and delete them. When creating/editing them a page similar to the 'Settings' page is provided. The main difference is that each input field is preceded by a checkbox. If a box is checked, the value being displayed overrides the global configuration. If not, the setting being displayed is inherited from the current domains' super domain. Therefore, to override a setting, remember to add a check in front of it. Removing a c heck effectively removes the override. Changes made to non-checked fields will be ignored. It is not possible to override what modules are used in an override. Some of that functionality can however be achieved via the 'enabled' option that each processor has. By overriding it and setting it to false you can disable that processor. It is even possible to have it set to false by default and only enable it on selected domains. Thus any arbitrary chain of processors can be created for each domain with one major exception. It is not possible to manipulate the order of the processors. It is possible to similarly disable/enable filters. It is also possible to add filters. You can not affect the order of inherited filters, and you can not interject new filters among them. Override filters will be run after inherited filters. RunOnce a job is in the pending queue the user can go back to the Console and start the crawler. The option to do so is presented just below the general information on the state of the crawler to the far left. Once started the console will offer summary information about the progress of the crawl and the option of terminating it. Monitoring the Crawler via the web UIOnce logged in the user will be taken to the Console. It is the central page for monitoring and managing a running job. However more detailed reports and actions are possible from other pages. Every single page in the admin interface displays the same info header. It tells you if the crawler is running or crawling a job (i.e. the state of the crawler). If a job is being crawled it's name is displayed as well as some minimal progress statistics. Information about the number of pending and completed jobs is also provided. JobsWhile a job is running this page allows users to view it 's crawl order (the actual XML configuration file), to view reports about a specific job (both are also available after the job is in the completed list) and the option to edit the job. As noted in the chapter about launching jobs via the WUI you cannot modify the pluggable modules but you can change the configurable parameters that they possess. This page also gives access to a list of pending jobs. LogsA very useful page that allows you to view any of the logs that are created on a per-job basis. Logs can be viewed by line number, time stamp, regular expression or 'tail' (show the last lines of the file). ReportsThis page allows access to the same crawl job report mentioned in the 'Jobs' page section. This report includes the number of downloaded documents and various associated statistics. URI Processing Chains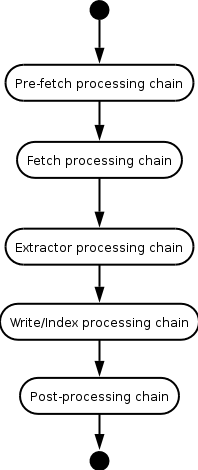
Each URI taken off the Frontier queue runs through the
Each processing chain is made up of zero or more individual processors.
For example, the extractor processing chain might comprise the
Generally, particular processors only make sense with in the context of one particular processing chain. For example, it wouldn't make sense to run the FetchHTTP processor in the Post-processing chain. The UI will only list those processors that make sense within the context of the current processing chain. Environment VariablesHERITRIX_HOME
Set this environment variable to point at the heritrix home directory.
For example, if you've unpacked heritrix in your home directory and
heritrix is sitting in the
% export HERITRIX_HOME=~/heritrix-0.5.2 JAVA_OPTSPass options to the heritrix JVM by populating the JAVA_OPTS environment variable with values. For example, if you want to have heritrix run with a larger heap, say 512 megs, you could do either of the following (assuming your shell is bash): % export JAVA_OPTS=-Xmx512m % $HERITRIX_HOME/bin/heritrix % JAVA_OPTS="-Xmx512m" $HERITRIX_HOME/bin/heritrix System PropertiesBelow we document the system properties passed on the command-line that can influence Heritrix behavior. heritrix.development
Set this property on the command-line (i.e. "-Dheritrix.development"
or include as part of
javax.net.ssl.trustStore
Heritrix has its own trust
store at
java.util.logging.config.fileThe heritrix conf directory includes a file named heritrix.properties . A section of this file specifies the default heritrix logging configuration. To override these settings, point java.util.logging.config.file at a properties file with an alternate logging configuration. Below we reproduce the default heritrix.properties for reference: # Basic logging setup; to console, all levels handlers= java.util.logging.ConsoleHandler java.util.logging.ConsoleHandler.level= ALL # Default global logging level: only warnings or higher .level= WARNING # currently necessary (?) for standard logs to work crawl.level= INFO runtime-errors.level= INFO uri-errors.level= INFO progress-statistics.level= INFO recover.level= INFO # HttpClient is too chatty... only want to hear about severe problems org.apache.commons.httpclient.level= SEVERE Here's an example of how you might specify an override: % JAVA_OPTS="-Djava.util.logging.config.file=heritrix.properties" \
./bin/heritrix --no-wui order.xml
|
|
|
| © 2003-2004, Internet Archive |
 License
 Project Info